


Replace windshields efficiently with our top-rated windshield cutting tool. DIY-friendly, professional results, and affordable. Order now!
You’ve been there. That sinking feeling when you see a rock chip in your windshield. At first, you try to ignore it, but it grows into an annoying crack that spiders across your field of vision. Replacing the windshield seems inevitable but oh so inconvenient. The auto shop quotes a small fortune and you cringe at the thought of being without your car for days.
Well, fret no more! Our top-rated windshield-cutting tool lets you replace your windshield quickly, easily, and affordably, right in your own driveway. With a simple electric cutter, quality adhesive, and illustrated instructions, you can do the job yourself just like a pro. Stop procrastinating and save your time, money, and sanity. Order now and be back on the road fast with a crystal-clear windshield!
Why You Need a Windshield-Cutting Tool


Save Time and Money
Why pay a mechanic or glass shop hundreds of dollars to replace your windshield when you can do it yourself in under an hour with an affordable windshield-cutting tool? These specialty tools are designed to easily and precisely cut through automotive glass so you can remove and install a new windshield quickly. No more waiting around at the shop or haggling over the bill. With a windshield-cutting tool, you’re in control.
DIY-Friendly and User-Safe
Don’t worry if you’ve never done windshield work before. Windshield-cutting tools are very DIY-friendly and designed to be safe for amateur use. They feature protective guards, non-slip grips, and specialized cutting edges that slice through glass without shattering or cracking it. As long as you follow the instructions, you’ll be able to remove and install a new windshield without issue.
Professional-Quality Results
A good windshield-cutting tool will provide clean, professional cuts just like an auto glass shop. Once you’ve cut out the old windshield, the new one will fit perfectly in place for an expert, OEM-quality installation. Your friends will think you paid a pro to do the job. With the right techniques, you can achieve the same results without the pro-level price tag using an affordable windshield-cutting tool.
So if you want to save hundreds on your next windshield replacement or just gain a useful new skill, invest in a high-quality windshield cutting tool. You’ll wonder why you didn’t get one sooner. The savings, convenience, and satisfaction of doing it yourself will make it well worth the small upfront cost.
How to Use a Windshield Cutting Tool
| Step | Description | Tips |
|---|---|---|
| Gather Your Supplies | * Windshield cutting tool (wire or powered cutter) * T-handles * Long blade knife * Suction cups * Safety glasses * Gloves * Windshield trim removal tool (optional) * Urethane sealant * Urethane primer * Cleaning supplies | * Choose the right tool based on your needs and skill. * Use high-quality sealant and primer designed for windshield installation. |
| Remove the Existing Windshield Seal | * Choose the right tool based on your needs and skills. * Use high-quality sealant and primer designed for windshield installation. | * Be cautious of the edge of the old windshield – broken glass can be extremely sharp. |
| Clean the Windshield Frame | * Remove all traces of old sealant and debris. * Use a suitable cleaner and scrape away any residue. * Thoroughly dry the windshield frame. | * A clean frame is essential for proper adhesion of the new sealant. |
| Apply the New Sealant | * Wear gloves and follow sealant instructions for application. * Apply a consistent bead of urethane sealant around the entire frame. | * Ensure the sealant bead is the correct width and thickness specified by the sealant manufacturer. |
| Install the New Windshield | * Use suction cups to lift and maneuver the windshield. * Carefully align the windshield within the frame. * Apply gentle pressure to ensure the windshield sits evenly in the sealant. | * Have an assistant help, especially with larger windshields. |
| Finish Up | * Allow the sealant to cure according to manufacturer instructions. * Avoid driving or putting undue stress on the windshield until fully cured. * Reinstall any removed trim and windshield wipers. | * A proper curing time is crucial for the safety and stability of the installation. |
Gather Your Supplies
To get started, you’ll need a few basic supplies: your windshield-cutting tool, replacement windshield, goggles, tape, and a vacuum. Make sure you have everything before you begin removing the old windshield.
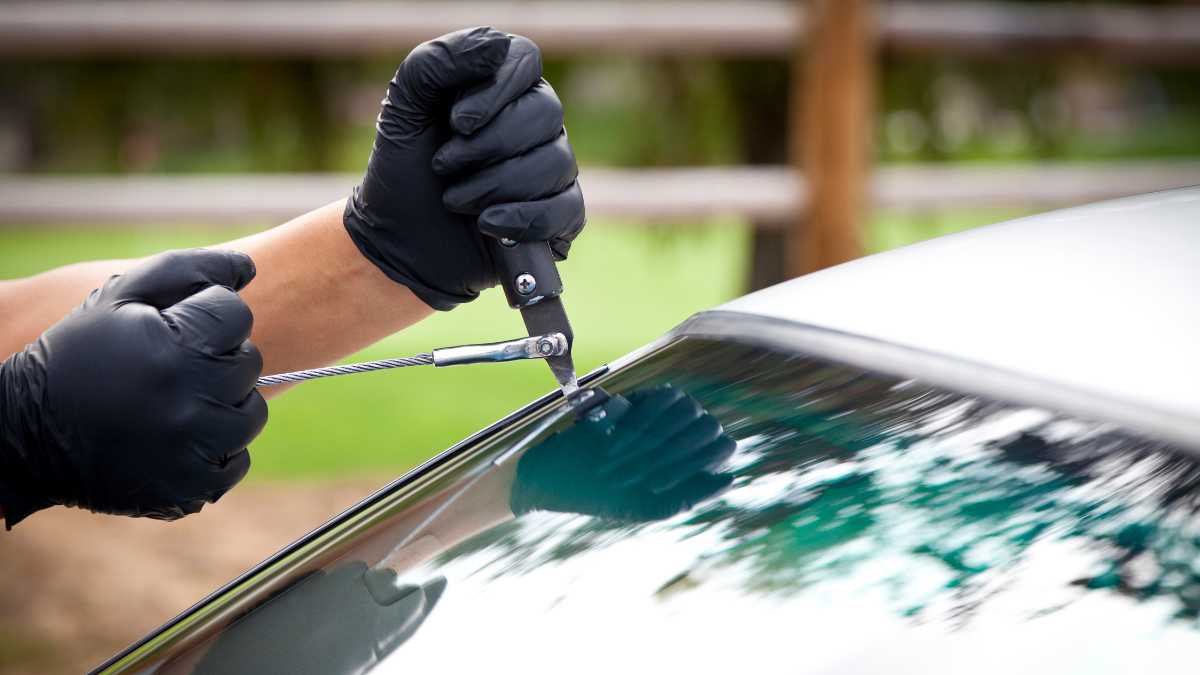
Remove the Existing Windshield Seal
Use your cutting tool to slice through the sealant around the entire windshield. Work slowly and carefully to avoid damaging the windshield frame. Once cut all the way through, use a putty knife to pry the seal away from the glass.
Clean the Windshield Frame
Vacuum up any remaining glass pieces or debris around the frame. Then wipe down the entire area with a degreaser or glass cleaner and let it dry completely. This will ensure your new windshield adheres properly.
Apply the New Sealant
Apply a continuous bead of urethane sealant around the edge of the windshield frame, leaving no gaps. For the best results, choose a high-quality sealant designed specifically for auto glass installation.
Install the New Windshield
Carefully lift your new windshield into place over the frame. Press firmly around the edges to secure it in the sealant. Then tape the windshield in place and let it dry as directed by the sealant instructions.
Finish Up
Once dry, you can remove the tape. Your new windshield should now be securely installed. Take your vehicle for a test drive to ensure it’s fixed properly before regular use. With some patience and the right tools, you’ll be seeing clearly again in no time.
Top 5 Windshield Cutting Tools

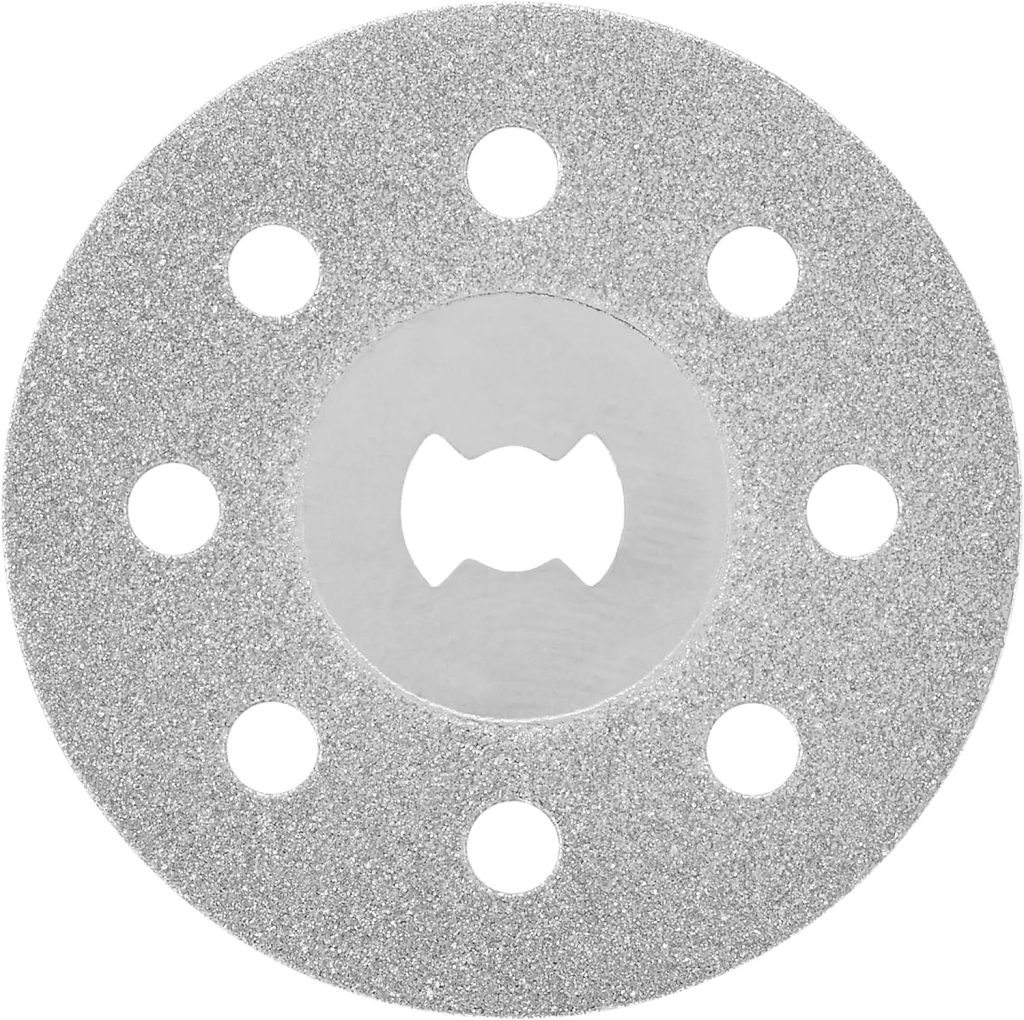
Dremel Rotary Tool Kit

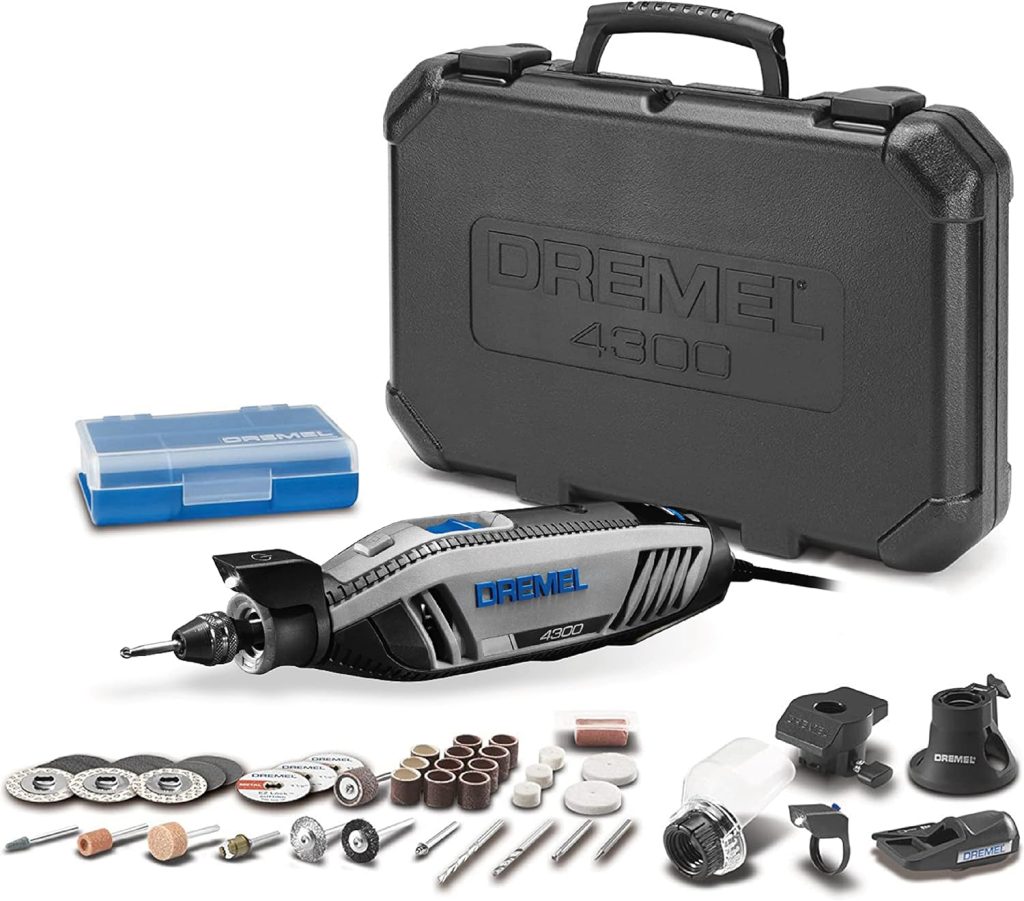
The Dremel rotary tool is a DIYer’s dream. This versatile tool can cut through auto glass with the right diamond cutting disc attachment. Dremel’s 4300 model offers variable speed control so you can take it slow while cutting curves. It’s compact, ergonomic, and budget-friendly.
With the right technique, you’ll get clean, professional cuts. The Dremel does require an initial investment in the tool itself plus attachments, but it has so many uses beyond cutting windshields.
Makita Angle Grinder

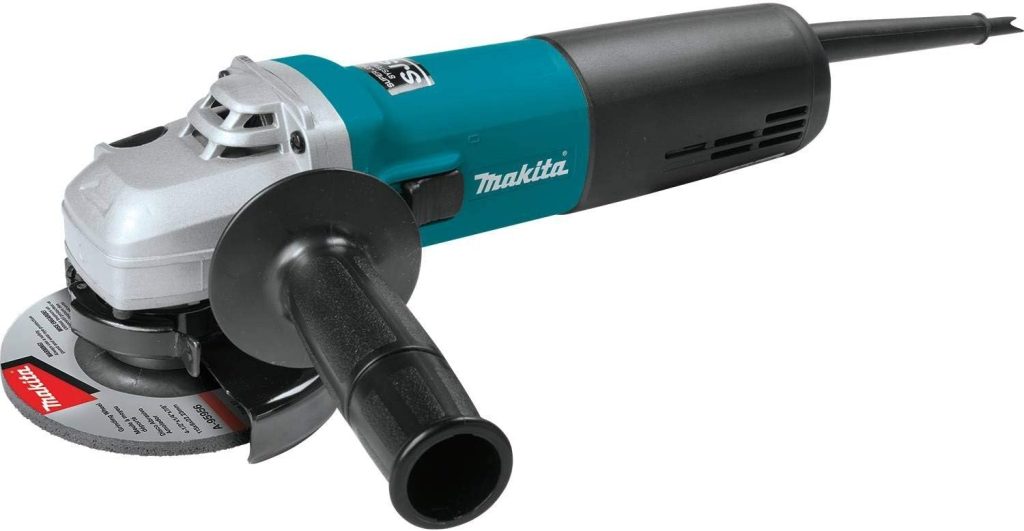
Angle grinders, like Makita’s popular 4-1/2 inch model, are excellent for cutting windshields. Their high-powered motors and diamond-cutting discs slice through glass with ease. Makita grinders are durable, portable, and deliver up to 6,500 RPM for fast cutting.
They do take some practice to master, as the exposed cutting disc requires careful control and technique. Angle grinders also tend to be on the higher end of the budget spectrum. But for high-volume windshield replacement, the investment in an angle grinder is worth it.
Rotozip Spiral Saw

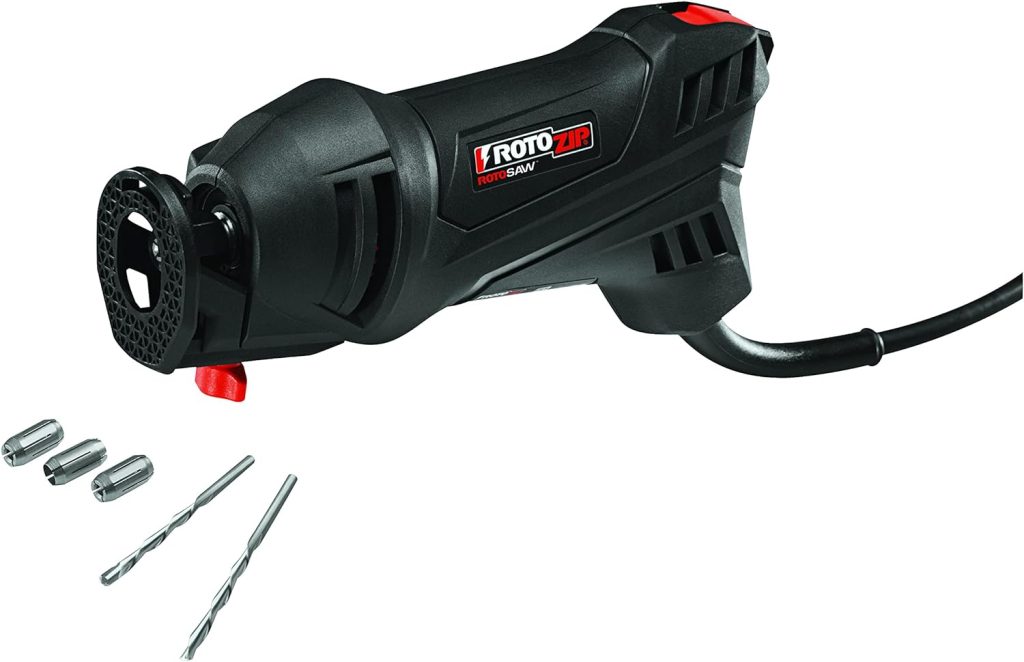
The Rotozip spiral saw utilizes a carbide-tipped bit to cut precise curves and shapes in glass. It’s a great all-purpose cutting tool for DIYers that delivers professional results when used properly. To cut a windshield, you’ll need Rotozip’s glass cutting kit which includes the right cutting bit and edge guide. The spiral-cutting action results in smooth cuts without chips or cracks. However, the Rotozip does require a steady hand and some practice to master. It’s also not the fastest cutting method but is very versatile.
Dremel EZ545 Diamond Cutting Wheel

For basic DIY windshield cutting on a budget, Dremel’s EZ545 diamond cutting wheel gets the job done. This inexpensive 4-1/2 inch cutting disc attaches to a standard rotary tool, jigsaw, or angle grinder. While not the most durable or longest-lasting cutting disc, the EZ545 works fine for cutting a single windshield or occasional use.
For around $10, it’s an affordable way to turn the tools you already own into windshield-cutting machines. You will need a steady hand and patience, as the cutting may not be as precise as more advanced cutting methods. But for a quick, budget-friendly solution, the EZ545 gets the job done.
Glass Cutter with Carbide Blade
A simple glass cutter with a carbide cutting wheel is a very affordable DIY option for basic windshield cutting. Popular brands like Red Devil and Muzata offer handheld cutters for under $20 that score and cut glass
DIY Windshield Replacement With Our Windshield Cutting Tool
| Step | Description | Considerations |
|---|---|---|
| Preparation | Gather tools (cutting tool, sealant, primer, safety gear, etc.), protect the vehicle interior, research your vehicle’s specific requirements. | Tool type will depend on preference (wire or powered), and you’ll need to source the correct windshield and supplies. |
| Windshield Removal | Cut out the old sealant, carefully remove the old windshield, clean the frame thoroughly. | Old windshields can be dangerous – proceed with caution and wear protective gear. |
| Sealant Application | Apply primer to the frame, apply a precise bead of urethane sealant. | Follow the sealant’s instructions for application and curing time. |
| Windshield Installation | Using suction cups, carefully install the new windshield, and apply gentle pressure. | Having a helper makes this step much easier. |
| Cleanup and Curing | Allow the sealant to fully cure, reinstall trim and wipers. | Curing time is vital for safe windshield adhesion. |
Cut Out Your Old Windshield
The first step is removing your damaged windshield. Use the cutting tool to carefully cut out the sealant around the edges of the windshield. Apply firm pressure and move slowly. Once the sealant is cut, you’ll be able to pop out the old windshield. Clean up any remaining debris before installing the new windshield.
Install the New Windshield
With the old windshield removed, you’re ready to put in the new one. Apply a bead of windshield sealant around the edge of the window frame. Get a friend to help lift the new windshield into place, then gently press to adhere it. Wipe away any excess sealant with a rag.
Curing the Sealant
For the best results, allow 24 hours for the windshield sealant to fully cure before driving your vehicle. This gives it time to harden and create an airtight, waterproof seal. While it’s curing, avoid slamming doors or doing anything to jostle the vehicle. The windshield will be securely in place once the sealant has hardened.
Drive Safely
With your new windshield installed and the sealant fully cured, you’re ready to hit the road again. For the first few days, avoid sudden braking, accelerating, or turning that could potentially strain the new seal. The sealant will continue to strengthen over the first week. Your new windshield should provide crystal clear viewing for years to come.
Using the cutting tool, you can replace your own windshield at a fraction of the cost of a professional replacement. The DIY process is straightforward and can be completed in the afternoon. Be sure to get the exact replacement windshield for your specific vehicle make, model, and year to ensure a perfect fit. With some patience, you’ll be back on the road seeing clearly again in no time.
Windshield Cutting Tool FAQs
How does a windshield-cutting tool work?
A windshield-cutting tool uses high-frequency vibrations to cut through automotive glass. It has a sharpened carbide tip that rapidly vibrates, heating up the glass and causing it to weaken. As you guide the tool along the cutting path, it slowly separates the glass into two pieces. The clean cut allows for a perfect fit and seal when installing a new windshield.
Do I need any special skills to operate it?
Using a windshield-cutting tool is easy and doesn’t require any special training. The tool is designed to be DIY-friendly so anyone can achieve professional results. All you need is a steady hand to guide the tool along the cutting path. The tool does the hard work for you, slicing through the glass with precision. Just be sure to follow the safety guidelines and instructions provided to avoid injury.
How long will it take to cut out a windshield?
The time it takes to cut out a windshield depends on the tool you’re using and your level of experience. On average, plan on 30-60 minutes for a novice to cut out a standard sedan windshield. Professionals using high-quality tools can complete the job in 15-30 minutes. The key is to work slowly and carefully, not rushing the cutting process. It’s better to take your time and get it right the first time.
Can I cut other types of glass with it?
Windshield-cutting tools are designed specifically for cutting automotive safety glass like windshields and side windows. They are not recommended for cutting plate glass, tempered glass, or any glass other than laminated automotive glass. The hardness, thickness, and composition of other glass types may damage the cutting tip or cause the tool to vibrate unpredictably, creating safety hazards. For best results, only use a windshield-cutting tool for its intended purpose.
How much does a windshield-cutting tool cost?
Windshield-cutting tools range from $50 to $500 or more, depending on the brand and quality. Basic DIY models with less power are very affordable, while high-performance professional tools with advanced safety features tend to cost significantly more. For most casual users replacing their own windshield, a mid-range tool from $100 to $200 should work great and provide value for the investment. The tool can be used many times to save money on future windshield replacements.


