


Learn the hassle-free process of assembling your US General 5 Drawer Tool Cart with our expert guide. Follow step-by-step instructions for seamless assembly.
You just got your brand new US General 5-drawer tool cart in the mail. Awesome! Now it’s time to put this bad boy together. Don’t sweat it – with our easy step-by-step guide, you’ll have that cart built and ready to roll in no time. We’ll walk you through the whole process from start to finish, with handy tips to make assembly a breeze.
No confusing diagrams or hard-to-follow instructions here! Just clear, simple steps tailored for beginners. Whether you’re a pro mechanic or a weekend tinkerer, our expert assembly guide has got you covered. So grab your tools and let’s get to work building your dream workshop on wheels! This handy tutorial makes constructing your cart hassle-free.
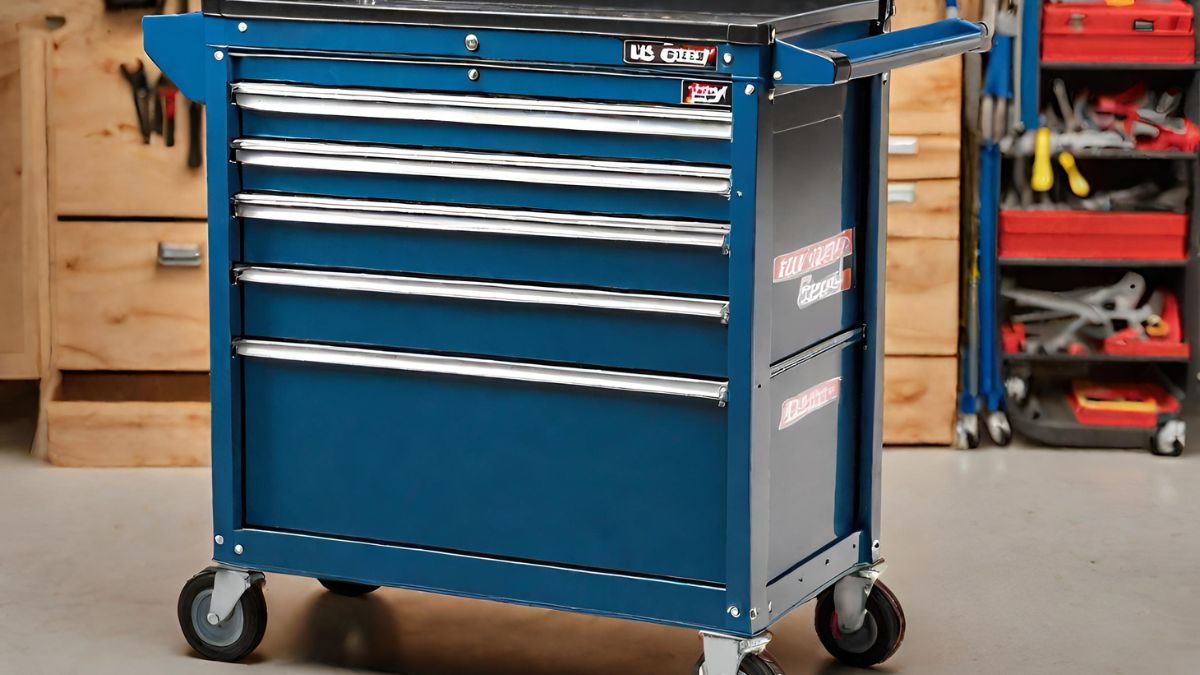
Overview of the US General 5 Drawer Tool Cart

This heavy-duty tool cart is ideal for any garage or workshop.
The five generously sized drawers provide ample space for tools, parts, and accessories. Each drawer can hold up to 100 pounds, so you can organize everything from wrenches and screwdrivers to power tools. Glide rails allow the drawers to open and close smoothly. Construction The cart has a durable powder-coated steel frame and drawers made of high-quality steel. Four 5-inch casters, two of which lock, allow you to easily move the cart between work areas. then lock it in place when needed.
Dimensions
The overall dimensions of the cart are 20 inches deep by 34 inches wide by 38 inches tall. The top surface provides a sturdy work area, and the cart’s open design means your tools stay within easy reach. Each drawer measures 17.25 inches front to back, so you have plenty of room for larger tools.
Assembly
Assembling the tool cart only takes about an hour for someone with moderate mechanical skills. All the parts are clearly labeled, and the included instructions are easy to follow. You’ll need standard tools like a wrench, screwdriver, and Allen wrenches. The cart comes with everything else you need, including all the necessary hardware.
With its high-quality components, versatile storage, and mobile design, the US General 5 Drawer Tool Cart is a workshop essential. For the hassle-free organization of your tools and a sturdy workspace, you can’t go wrong with this cart. Your perfectly organized garage awaits!
Preparing for US General 5 Drawer Tool Cart Assembly

| Step | Description |
|---|---|
| 1 | Unbox the tool cart and lay out all components. |
| 2 | Assemble the castor assemblies by attaching them to the bottom shelf. |
| 3 | Attach the corner posts to the main box. |
| 4 | Bolt the main box to the top. |
| 5 | Securely fasten any additional accessories or trim kits. |
Gather the necessary tools
To assemble your US General 5 Drawer Tool Cart, you’ll need some basic tools like a Philips head screwdriver, adjustable wrench, and Allen wrenches. Make sure you have all the parts laid out and hardware packets opened before you get started.
Read through the instructions thoroughly
Even though this cart may seem straightforward to assemble, it’s important to read through the included instructions from start to finish. Familiarize yourself with all the parts and understand how everything fits together. Pay close attention to diagrams and warning labels. Taking time upfront to understand the process will save you headaches down the road.
Work slowly and carefully
Because this cart has many moving components like drawers, it’s critical to work slowly and deliberately. Double-check that you have each part in the proper orientation before securing anything in place. It’s much easier to get things right the first time rather than having to backtrack and undo steps. If at any point you feel confused or frustrated, take a break. Come back to the project with fresh eyes and a clear mind.
Consider getting an extra set of hands
While a single person can certainly assemble this tool cart alone, having an extra helper can make the process faster and easier. Some steps require holding parts in place while securing them from the opposite side. An extra set of hands means not having to maneuver around the cart or balance pieces precariously on your own. If working solo, be very careful during these steps.
By preparing properly, taking your time, and leveraging help if needed, you’ll have your US General 5 Drawer Tool Cart assembled in no time. Then you can start organizing your tools and getting your garage into tip-top shape!

Step-by-Step Instructions for Assembling the Drawers
Now that you have the tool cart frame assembled, it’s time to install the drawers. The drawers allow you to keep all your tools and accessories organized and within easy reach. Follow these steps carefully to ensure the drawers are installed properly:
| Step | Description |
|---|---|
| 1 | Unbox the Tool Cart: Begin by unboxing the tool cart and laying out all the components. Make sure you have all the necessary parts before proceeding. |
| 2 | Assemble the Castor Assemblies: Attach the castor assemblies to the bottom shelf of the cart. These wheels will allow you to move the cart around easily. |
| 3 | Attach the Corner Posts: Connect the corner posts to the main box of the tool cart. These posts provide stability and support for the drawers. |
| 4 | Bolt the Main Box to the Top: Securely fasten the main box (which includes the drawers) to the top section of the cart. Use the provided bolts and follow the manufacturer’s guidelines. |
| 5 | Add Accessories or Trim Kits (if applicable): Depending on your specific model, you may have additional accessories or trim kits. Attach them according to the instructions provided. |
Attach the drawer slides
The drawer slides allow the drawers to open and close smoothly. Attach one drawer slide to each side of the drawer using the included screws. Make sure the slides are at equal heights for proper drawer movement. Then attach the other end of each slide to the inside of the tool cart frame.
Install the drawers
With the drawer slides attached, you can now install the drawers. Gently slide the drawers into the frame along the drawer slides. The drawers should move freely when properly installed.
Add the drawer fronts
The drawer fronts give the tool cart a finished look and also provide handles to open the drawers. Place a drawer front on the front of each drawer and attach using the included screws. Make sure the drawer front is level before tightening the screws completely.
Test and adjust
Once the drawer fronts are on, test that each drawer is sliding properly and closing fully. If a drawer is sticking or not closing all the way, you may need to adjust the drawer slides. Loosen the screws attaching the slide to the frame, adjust the slide position slightly, and re-tighten the screws. Test the drawer again and repeat the adjustment until the drawer is moving freely.
With the drawers assembled and working properly, your US General 5 Drawer Tool Cart is now complete! Load up your tools, equipment, and accessories and you’ll have everything neatly organized and ready to roll. Enjoy your new tool cart!
Installing the Casters and Handles
When it comes time to attach the casters and handles to your tool cart, take it slow and be careful. These components are what make the cart mobile and easy to maneuver, so you want to get them on right.
Attaching the Casters
First, flip the main cabinet over so it’s resting on its top. Locate the four pre-drilled caster mounting holes—two in the front and two in the back. Now find the casters and caster mounting plates in your hardware pack.
Thread the four bolts through the caster mounting plates and into the pre-drilled holes in the bottom of the cabinet. Use the included wrench to tighten the bolts until the casters are securely fastened. Be careful not to overtighten, or you may crack the wood.
Once the casters are on, you can flip the cabinet right-side up. Give it a spin to ensure all four casters are rolling smoothly and the cart moves easily. If any casters seem stuck or wonky, loosen the bolts and re-seat the caster, then re-tighten.
Attaching the Handles
- With the help of an assistant, lift the cabinet into its upright position. Locate the two pre-drilled handle holes on either side of the top drawer.
- Find the two metal handles in your hardware pack along with the accompanying bolts and nuts. Hold a handle up to one of the pre-drilled holes to ensure it’s positioned evenly, then insert the bolts through the holes in the handle and drawer front.
- Thread the nuts onto the bolts from behind the drawer and tighten with the wrench until snug. Be sure not to overtighten, or it may become difficult to open the top drawer.
- Repeat the same process for the other handle. Once both handles are installed, give them a firm tug to ensure they’re on tight and ready for years of use. Your US General 5 Drawer Tool Cart is now fully assembled and ready to organize your tools and supplies. Enjoy!
US General 5 Drawer Tool Cart Assembly FAQs
What tools will I need?
You’ll only need some basic tools to assemble your tool cart like a flathead screwdriver, Phillips head screwdriver, wrench, and Allen wrenches. The kit comes with all the necessary hardware, so you won’t need to supply your own nuts, bolts, or washers. Make sure you have enough space to lay out all the parts before getting started.
How long will assembly take?
Assembly time can vary depending on your mechanical skill level, but you can expect it to take between 30 to 60 minutes for a beginner. The instructions are pretty straightforward but go slowly and carefully to ensure everything is put together properly. Don’t rush the process, especially when installing the drawers, to avoid potential issues down the road.
Do I need help from another person?
You can certainly assemble the tool cart yourself, but having an extra set of hands will make the job go faster and easier. Some of the parts like the side panels and drawers can be bulky and difficult to maneuver on your own. If you do work alone, be very careful when handling the larger pieces to avoid injury or damage.
How do I level the cart?
Once the cart is fully assembled, check that it’s level before loading it up or moving it into place. Most floors are not perfectly even, so you may need to make some adjustments to the leveling feet at the bottom of the cart. Loosen the nuts on the feet, then turn the feet to raise or lower that corner until the cart is balanced. Tighten the nuts to lock the feet in place. A level tool can help determine which corners need adjustment.
How much weight can the drawer slides hold?
The high-quality ball-bearing drawer slides are rated to hold up to 100 lbs per drawer when properly installed. Make sure not to overload the drawers to prevent damage to the slides or the contents from shifting around when you open and close the drawers. Distribute weight evenly in the drawers and avoid concentrating heavy items in one section of the drawer.
Conclusion
So there you have it – a complete walkthrough for assembling your new US General 5 Drawer Tool Cart without any headaches. Just take it one step at a time, follow the instructions carefully, and before you know it that shiny new cart will be all set up and ready to organize your workspace. With the right tools and a little patience, you’ll be admiring your handiwork in no time.
And just think how great it’ll feel to have everything neatly stowed away in your custom, heavy-duty storage solution. No more clutter and rummaging to find what you need. Now your tools can have a proper home – all thanks to a few turns of your screwdriver and wrench. Nice job! Your organizing skills are top-notch.


