


Discover the best tool to remove hub assemblies effortlessly. Our expert guide provides step-by-step instructions and time-saving tips. No need for a shop press or complicated procedures. Get your wheel hubs and bearings back on track!
You’re stuck. That hub assembly on your car just won’t budge. No matter how much elbow grease and brute force you throw at it, the darn thing is seized up tighter than Fort Knox. We’ve all been there – sweating and swearing as we battle a rusted or stubborn part. But there’s good news! Removing hub assemblies doesn’t have to involve sketchy DIY presses or rounds of fisticuffs with your vehicle.
We’ve got your back. In this article, we’ll walk through an efficient, fool-proof method to extract even the most stubborn hub assemblies using an ingenious little tool. No need to call in the big guns or get medieval on your ride. Just grab a beverage, put your feet up, and let us guide you through this quick and painless repair. You’ll be rolling on fresh bearings and hubs in no time.

The Challenges of Removing a Hub Assembly
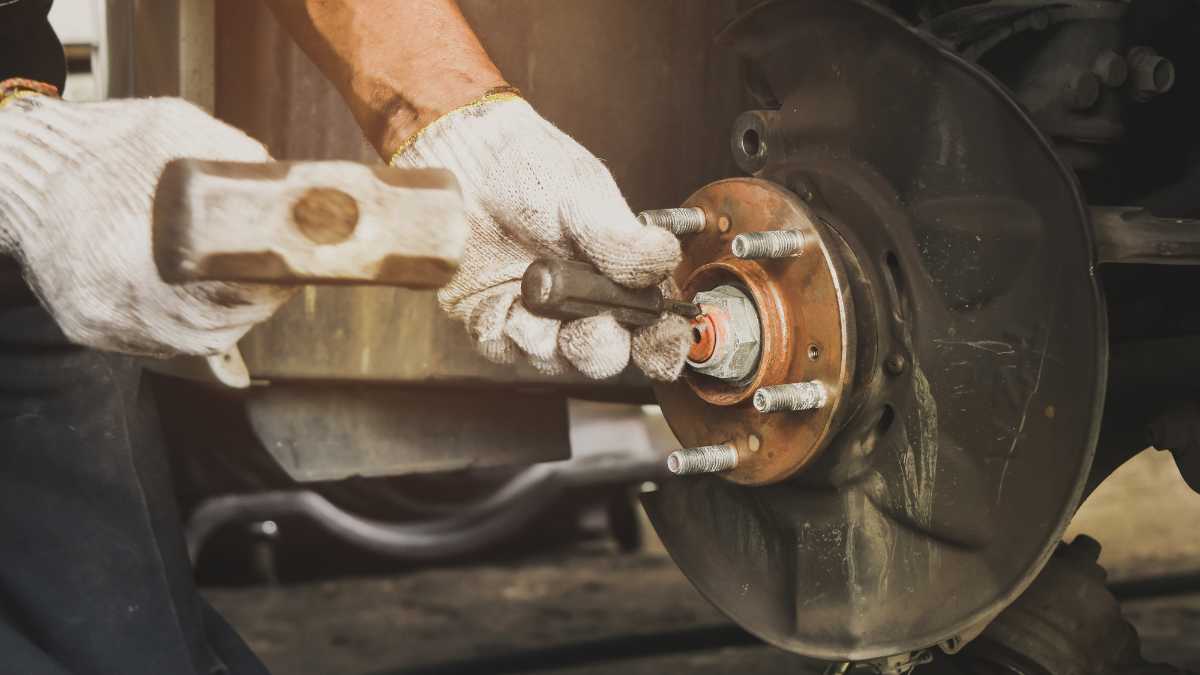
Removing a hub assembly can be tricky business. To start, those bolts holding the hub to the spindle can be stubborn after years of exposure to the elements. Penetrating oil and some elbow grease usually do the trick, but be prepared for some stuck hardware.
| Challenges | Description |
|---|---|
| Rusty Parts | Rust buildup on bolts, nuts, and other components can make disassembly difficult. |
| Tapered Bearings | Tapered roller bearings require precise handling during removal to avoid damage. |
| Sealed Bearings | Sealed hub bearings may need specialized tools to extract them without compromising their integrity. |
| Hub Seals | Hub seals can be stubborn to remove, especially if they’ve been in place for a long time. |
Rusty Parts
If you live where roads are salted in winter, rust is an inevitable foe. The hub, bearings, and spindle can all become corroded over time, fusing parts together and complicating disassembly. Wire brushes, rust removers, and patience are key.
Tapered Bearings
Many hubs use tapered roller bearings that must be removed in a precise order. The inner bearing cone, outer bearing cone, and roller cage all fit together at specific angles. Removing them out of order or reinstalling them incorrectly will damage the bearings.
Sealed Bearings
Some hubs use pre-lubricated sealed bearings that don’t require re-packing. Great for convenience but bad for accessibility. Prying out sealed bearings without damaging them takes a gentle touch. Protect the bearings from impacts and scratches, or you’ll be stuck buying a whole new set.
Hub Seals
Hub seals, like neoprene O-rings or rubber gaskets, can also prove challenging to remove and reinstall without tearing or deforming them. Have spare seals on hand in case the originals don’t survive removal. Lubricate seals during reinstallation to avoid pinching them.
With time, patience, and the proper tools, removing a hub assembly is definitely doable for a DIYer. But when trouble arises, don’t hesitate to consult a pro to avoid damage or injury. Your wheels and bearings will thank you!

Introducing the Ultimate Tool to Remove Hub Assemblies
Removing wheel hub assemblies can be tricky business without the proper tools. Forget about messing around with a shop press or other complicated contraptions. The bearing puller is the only tool you’ll need to get the job done quickly and efficiently.
| Tool | Description | Estimated Cost |
|---|---|---|
| Slide Hammer | Pulls stuck hub assemblies with forceful blows. | $50 – $150 |
| Hub Puller Adapter Set | Set of adapters compatible with your vehicle’s lug pattern. Connects to slide hammer. | $20 – $50 |
| Socket Wrench Set | Various sizes for removing lug nuts and other fasteners. | $20 – $100 |
| Wrenches | Open-ended and/or combination wrenches for additional fastener removal. | $10 – $30 |
| Breaker Bar | Provides extra leverage for stubborn bolts. | $10 – $20 |
| Torque Wrench (for reinstallation) | Ensures proper tightness of bolts during reassembly (critical for safety). | $20 – $50 |
| Penetrating Lubricant | Loosens rusted or seized fasteners. | $5 – $10 |
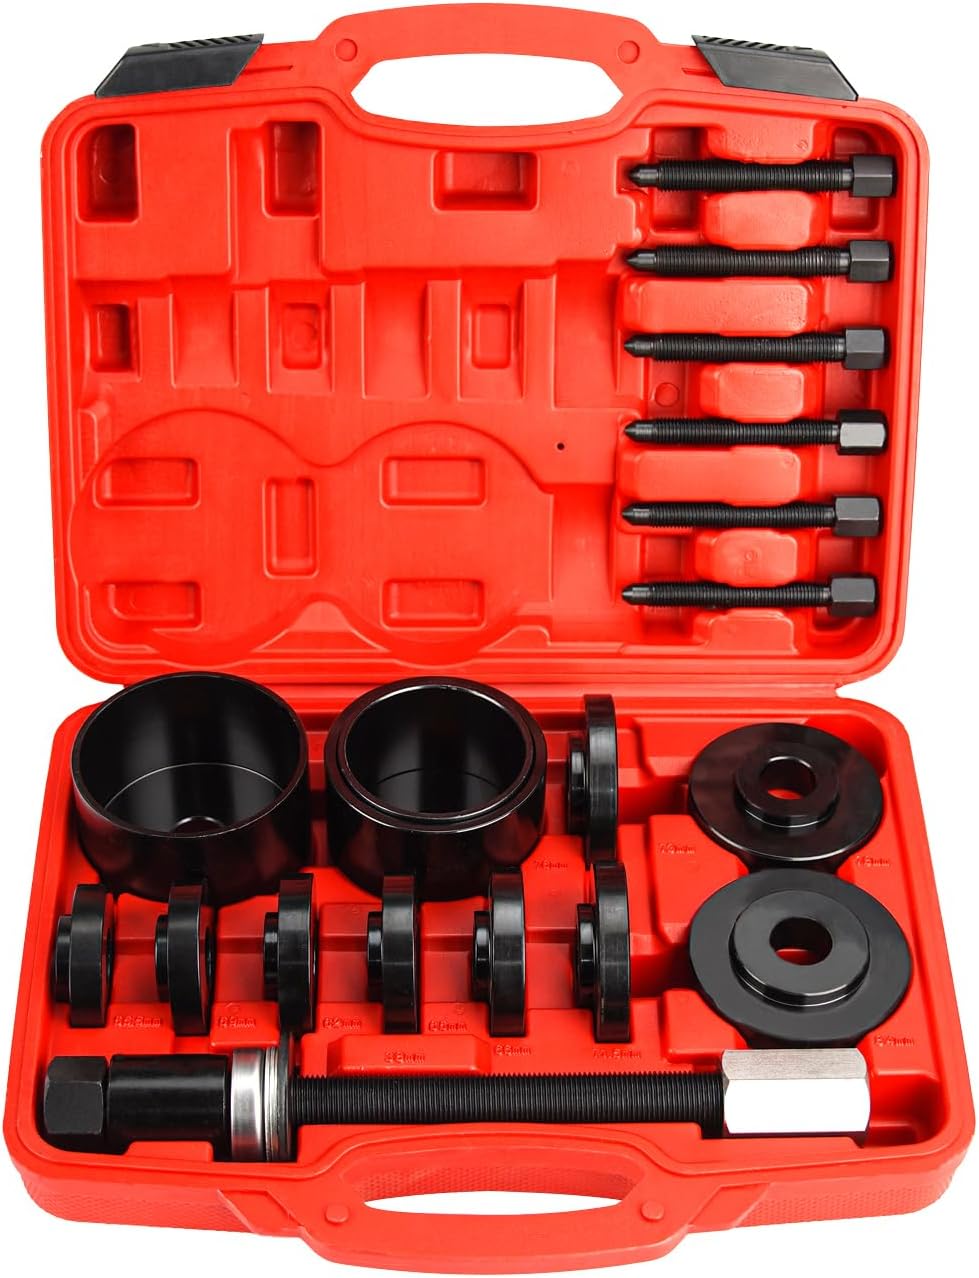
A Simple Yet Effective Design
The bearing puller features a straightforward design that gets right to the point. At its core, it consists of a sturdy threaded rod and two plates that attach at either end. As you twist the rod, the plates are drawn closer together, applying even pressure to the hub assembly. This allows you to pry the entire unit out in one piece without damage. The puller’s compact size also gives you better access to work areas with limited space.
A Timesaver
Using a traditional shop press to remove hub assemblies is a tedious, multi-step process. It requires removing the axle, disassembling the brakes, and then pressing out the unit. With a bearing puller, you can remove the entire hub assembly in under 30 minutes without having to take anything apart. This single tool eliminates hours of work and allows you to complete the job with minimal fuss.
Protects Components
The smooth, controlled action of the bearing puller helps prevent damage to expensive wheel components like the axle, brake rotors, and calipers. Its even pressure and grip ensure the hub assembly comes out intact. There’s no risk of the violent, uncontrolled release that can occur with other removal methods. Your wheels and brakes will thank you!
In the end, the bearing puller is an inexpensive tool that will save you time, money, and a lot of frustration when removing your hub assemblies. This handy device deserves a spot in any serious mechanic’s toolbox.
Step-by-Step Guide to Using the Hub Assembly Removal Tool
| Step | Description | Tools Needed |
|---|---|---|
| 1. Preparation | Loosen lug nuts, elevate the car securely, and remove the wheel. | Lug wrench or impact wrench |
| 2. Disassembly | Remove brake caliper and rotor as needed. Disconnect any suspension components connected to the hub assembly (tie rods, ball joints, etc.). | Socket wrench set, wrenches, ball joint separator (if needed) |
| 3. Remove Axle Nut | Remove the large central axle nut (if applicable). | Large socket, breaker bar |
| 4. Attach Hub Puller | Select the appropriate adapter from the hub puller set and attach it to the hub assembly using the lug nuts. | Hub puller adapter set, lug wrench |
| 5. Connect Slide Hammer | Attach the slide hammer to the hub puller adapter. | Slide hammer |
| 6. Apply Force | Slide the hammer forcefully outward. Repeat as needed to dislodge the hub assembly. Watch for the hub coming loose from the spindle. | Slide hammer |
| 7. Additional Techniques (if needed) | If severely stuck, try applying penetrating lubricant, heating the surrounding area (with caution), or using alternate methods like a hydraulic press. | Penetrating lubricant, torch (use extreme caution), hydraulic press |
Gather the Necessary Equipment
To remove your hub assembly, you’ll need a few basic tools: the hub removal tool (a slide hammer style tool with hub adapter attachments), a lug wrench, penetrating oil, and wheel chocks. The hub removal tool allows you to remove the most stubborn hub assemblies with ease.
Loosen the Lug Nuts
Park the vehicle on a level surface and engage the parking brake. Loosen the lug nuts on the wheel with the lug wrench, but do not remove them yet. Apply penetrating oil to the lug nuts and hub area. Let it soak in for at least 30 minutes.
Install the Hub Removal Tool
Attach the proper hub adapter to the hub removal tool for your specific vehicle make and model. Position the tool behind the hub, threading the adapter bolts through the lug holes. Hand-tighten the bolts to secure the tool in place.
Remove the Lug Nuts and Wheel
Now fully remove the lug nuts and set aside. Remove the wheel from the wheel hub. With the wheel out of the way, you’ll have full access to the hub assembly.
slide Hammer the Hub Off
Thread the slide hammer into the hub removal tool adapter. Holding the tool in place, swiftly and forcefully slide the hammer up and down to break the hub assembly free from the axle shaft. This may take repeated blows. Work around all sides of the hub to release it evenly.
Clean and Inspect the Axle
Once removed, clean the axle shaft end and hub assembly mating surface. Inspect for any damage or excess wear. If all looks well, you can reinstall the hub assembly and wheel. Replace any damaged or worn-out parts before reassembly.
Using a quality hub removal tool will make quick work of removing even the most stubborn hub assemblies. Be sure to follow all instructions and safety precautions provided with your specific tool. With some penetrant, elbow grease, and the proper technique, you’ll have your hub assembly out in no time and back on the road!
Tips for Smooth and Safe Hub Assembly Removal
| Tip | Description |
|---|---|
| Consult a Service Manual | Get the exact procedure, torque specifications, and any special instructions for your vehicle. |
| Use Penetrating Lubricant | Apply liberally to seized bolts and the hub/axle interface. Let it soak in overnight if possible. |
| Start Gentle, Increase Force | Begin with smaller taps on the slide hammer and increase force gradually as needed. |
| Protect Threads | Put lug nuts back on partially when hitting the slide hammer to avoid damaging the wheel stud threads. |
| Check for Retaining Clips | Some axles have retaining clips that need to be removed before the hub will slide off. |
| Inspect for Damage | Examine the removed hub and the spindle for wear or damage that might require further repairs. |
| Mind the ABS Sensor | Disconnect and handle the wheel speed sensor (if equipped) with care to avoid damage. |
| Clean Surfaces Before Reassembly | Remove rust or debris from mounting surfaces to ensure a proper fit with the new hub. |
Gather the Proper Tools
The two essential tools you’ll need are a hub puller tool and penetrating oil. A hub puller attaches to the hub assembly and uses leverage to pry it off without damaging the wheel or spindle. Penetrating oil helps loosen any rust or corrosion, making removal much easier. You may also want safety glasses, work gloves, and wheelchairs.
Loosen the Hub
With the wheel still on, spray all sides of the hub assembly with penetrating oil. Let it soak in for at least several hours or overnight. This will help loosen the bond between the hub and spindle. Then, jack up the vehicle and place wheel chocks behind the front tires to prevent rolling. Remove the wheel lug nuts and take off the wheel.
Attach the Hub Puller
Position the hub puller tool over the hub assembly so its arms slide under the edge of the hub. As you turn the forcing screw or bolt in the center of the tool, the arms will exert outward pressure to pry off the hub. Place a block of wood between the hub puller and spindle for extra leverage and protection. Tighten the forcing screw 1/2 turn at a time, checking in between turns.
Remove and Clean the Spindle
Once you’ve detached the hub assembly, use a wire brush to scrub off any remaining debris or rust on the spindle. Wipe clean with a rag and apply fresh grease to prevent future sticking. Be very careful not to damage the spindle surface, as this can affect wheel balance or allow moisture to penetrate.
Reinstall the Hub and Wheel
Slide the hub assembly back onto the spindle, making sure all parts are fitted properly. Hand-tighten the wheel lug nuts to hold everything in place. Jack down the vehicle and tighten the lug nuts in a star or criss-cross pattern with a lug wrench. Replace tools and supplies, and you’re all set to drive safely again!
Following these tips will make removing your wheel hub assemblies quick, safe, and hassle-free. With the proper tools and technique, you can complete this repair yourself and avoid paying a shop. Just take your time and be careful, and you’ll be back on the road in no time.
Frequently Asked Questions About Removing Hub Assemblies With This Tool
How does this tool work?
This specialized hub removal tool attaches to your wheel hub and bearing assembly, allowing you to remove it without needing a hydraulic press. The tool has specially designed ‘jaws’ that grip onto the outer edge of the hub. As you turn the forcing screw on the tool, it applies pressure around the edge of the hub, slowly forcing it out of the steering knuckle. The tool does all the hard work for you with minimal effort on your part.
Do I need any special skills or training to use this tool?
No special skills or training are required to use this hub removal tool. It’s designed to be very intuitive and easy to operate. As long as you follow the instructions, anyone with basic mechanical skills and knowledge can remove their wheel hub assemblies with this tool. The tool provides all the necessary leverage and force needed, so you don’t have to be exceptionally strong either.
How long does it take to remove the hub assembly with this tool?
Removing your hub assembly with this tool typically only takes between 30 to 60 minutes for a novice, depending on the specific make and model of your vehicle. An experienced mechanic can often complete the job in under 30 minutes. The tool significantly reduces the time required compared to attempting to remove the hub assembly with a hydraulic press in a shop. You can do the work yourself in your own garage and get your vehicle back on the road much faster.
Will this tool damage my vehicle in any way?
When used properly according to the instructions, this hub removal tool will not damage your vehicle. It is specifically designed to apply controlled pressure around the edge of the hub, forcing it out without damaging the steering knuckle, axle, or wheel studs. However, as with any work done to a vehicle, there is always a small risk of unforeseen damage. It’s a good idea to have a qualified mechanic inspect your work when you’ve finished to ensure there are no issues before driving your vehicle.
Can this tool be used on any make or model of vehicle?
This hub removal tool can be used on most standard passenger vehicles, light trucks, and SUVs. However, it may not be suitable for some heavy-duty or performance vehicles. The tool is available for hubs with 5-, 6- and 8-lug bolt patterns, to suit most common vehicles. But for certain makes, models or hub types, a hydraulic press may still be required for safe removal. Check your vehicle specifications to ensure this tool will work for your needs.
Conclusion
So there you have it, folks. Removing those stubborn hub assemblies doesn’t have to be a huge ordeal anymore. With the right puller tool and a bit of elbow grease, you can tackle this repair job yourself and save some dough in the process.
Just follow the steps we laid out, take your time, and before you know it that hub will slide right off. Now you’re ready to service those bearings and get rolling again. Hope this guide gave you the confidence and know-how to DIY this repair and keep your ride running smoothly. Let us know if you have any other stubborn auto jobs you want us to demystify! We’re always here to help you become a more self-sufficient wrencher.


